

Wow... What a minute it has been - or rather, a year, since that's how long it's been since I've blogged on Vintage Seance! There is a big reason why I've been away, which I'll explain further in my next post, but for now, this one's a majorly belated update on the fun and crafting I got up to last Halloween...
During last Halloween, I was in the process of moving all over again, this time I was lucky enough to get to move in with Patrick, and our cat Fiona (Cocoa got to stay with my parents, but I get to see her often, thank goodness). With so much to do, I didn't plan on hosting any party whatsoever - that is until our good friends Tyler "Butter," and his wife Molly offered to let me decorate for their Halloween party! With the festivities back on, I thought I'd mix it up and work with a whole new theme. Fans of The Lord of the Rings, Marvel, DC, Star Wars, Jurassic Park - basically any and every fun-filled franchise - Molly and Butter know a thing or two about that fandom life. Me? Not so much, I'm over hear watching AHS and Harry Potter, but that's about it... except for one other show I knew we equally loved... Stranger Things.
The Haunt
That 80's Feel:
First off, I have to thank Butter and Molly for their awesome old school contribution to the haunt that really set the scene for me; these these adorable 80's-style paper cutouts:


I honestly adored these so much it made me nostalgic for Halloweens from when I was a kid. Easy, fun, and festive!
Castle Byers:
Wanting to transport guests into the Stranger Things world, we decided to add a little Will Byers flare to the entry by adding branches along the doorway and windows, and, of course, Will's Castle Byers' signs...


Although I wanted to make more authentic looking signs made from real wood, I found these useful stick-ons from one of my go-to Halloween hot spots, Costume Castle.

Did my best to copy Will's handwriting...


Lit Up Walls:
I wish I could take credit for this greatness, but alas Butter and Molly had already had this up all year - no joke! Just a testament to how awesome they are. Obviously worked out perfectly...


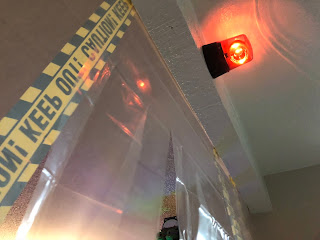
The Lab:
At first I wasn't sure about putting anything in the fluorescent lit kitchen area, but then it dawned on me how perfect a space it would be to pay homage to Hawkins Lab itself... Adding my (not so great) depiction of the famous Hawkins Laboratory sign (seriously why didn't I just use sticker letters?!), a shredded shower curtain for entry, caution tape, and an emergency red flashing light were a great start toward capturing the atmosphere. For our bar we added a variety of beakers and test tubes. Place food coloring and water (or booze and cocktails) and shots in test tubes - and you've got a party lab! No Hawkins Lab would be complete however without a good old fashion Demogorgon...


I have to say, although I think this guy came out looking alright, I wish I had created him differently, using some easier to work with materials - would have saved me from a lot of trouble. (SEE BELOW)
For his head (which I do think came out great), I used a basic styrofoam head as the base, foam paper for the flaps, and masking tape for the edges (I covered some raffia with masking tape to create some texture, you could use butcher paper, or foil as well) on the flaps.


With this I was able to poke through the foam and then hot glue the wire to the back of each flap, this way the wire kept the flap in place, and was now posable so I could move the flaps as needed.


I also cut off the nose of the face and covered the whole face with Delight and air modeling clay compound - this stuff is magic. I created the entire texture of the Demogorgon face with it as well as all of his spiky teeth!


I placed the head onto the leg of an upside down small easel (this way it appeared the head was coming forward, out of the wall) and attached it all to a foam board with glue, and tape for extra support. I then attached a fake arm as well with glue and tape (not very sturdy, so I don't reccommend). The other hand I did not give an arm, instead I turned it the other way and curved the fingers inward to make it seem like this was the hand the Demogorgon was using to grip the portal. I painted the inside of the flaps/face a deep red, mixing darker colors like purple and black the closer I got to the center of the face. After it dried to attached all of the many modeling clay teeth I made with my hot glue gun (I let the stringy/gooey bits of glue . I later went back to paint the edge of the flaps, the back of the head, the neck, and the hands were all a pale pink/kahki color with streaks of red to look more life-like.


Surrounding the main features, I added foil, covered in masking tape (to make painting easier) that would all serve as an entrance between our world and the Upside Down. Leaving extra foil to play with for texture, I painted the "portal" material black with hints of purple, red, and brown. Overall, I love how the head and hands came out, but I really wish my engineering skills were better and that I could have attached them more efficiently to the board, and had had more time to make a more impressive portal surrounding him.


I had to honor Barb somehow so I figured I'd recreate her for the haunt - and had way too much fun with it! Firstly, I used a styrofoam head from the craft store, and used some Delight Air Modeling Clay again to create those dead eyelids, and open mouth, and painted her skin tone and eyes...


Once her face, and attached wig all came together, I hot glued the head of an old snake prop to her mouth (a snake once used for my medusa costume from a past Halloween). After that I added all those nasty colors to her face with purples, blues, and greens...


Once she was covered, we drilled her to the ceiling of the garage and added more cheesecloth, fake spider webs, and large Upside Down tentacles made of foil, spray-painted black...

Although I usually like to take my haunts from 0 to 100, this Halloween was oddly, and pleasantly different. I usually go above and beyond, but given our circumstances, I had no choice but to go with the flow and see what worked - and I still managed to create both a demogorgon and a dead Barb, not bad! Overall, I'm happy with how it turned out, and happy the party I got to decorate turned out to be a blast!
At first I wasn't sure about putting anything in the fluorescent lit kitchen area, but then it dawned on me how perfect a space it would be to pay homage to Hawkins Lab itself... Adding my (not so great) depiction of the famous Hawkins Laboratory sign (seriously why didn't I just use sticker letters?!), a shredded shower curtain for entry, caution tape, and an emergency red flashing light were a great start toward capturing the atmosphere. For our bar we added a variety of beakers and test tubes. Place food coloring and water (or booze and cocktails) and shots in test tubes - and you've got a party lab! No Hawkins Lab would be complete however without a good old fashion Demogorgon...


(Oh yeah, I dressed up as Nancy Wheeler, too!)
I have to say, although I think this guy came out looking alright, I wish I had created him differently, using some easier to work with materials - would have saved me from a lot of trouble. (SEE BELOW)
The Upside Down:
With a garage filled head to toe in faux spiderwebs, it made for there perfect place to put my Barb - yes, I made a dead Barb. And yes, we attached her to the ceiling, but things are upside down in the Upside Down, right? (SEE BELOW)


HOW I MADE A DEMOGORGON:
For his head (which I do think came out great), I used a basic styrofoam head as the base, foam paper for the flaps, and masking tape for the edges (I covered some raffia with masking tape to create some texture, you could use butcher paper, or foil as well) on the flaps.

I attached the flaps, after cutting them into their shapes, by using posable garden wire:

With this I was able to poke through the foam and then hot glue the wire to the back of each flap, this way the wire kept the flap in place, and was now posable so I could move the flaps as needed.


I also cut off the nose of the face and covered the whole face with Delight and air modeling clay compound - this stuff is magic. I created the entire texture of the Demogorgon face with it as well as all of his spiky teeth!


Surrounding the main features, I added foil, covered in masking tape (to make painting easier) that would all serve as an entrance between our world and the Upside Down. Leaving extra foil to play with for texture, I painted the "portal" material black with hints of purple, red, and brown. Overall, I love how the head and hands came out, but I really wish my engineering skills were better and that I could have attached them more efficiently to the board, and had had more time to make a more impressive portal surrounding him.
HOW I MADE BARB:


I then scored at the thrift store and found on-point look-alike glasses. I then painted what looked like a broken glass image with a fine point paint brush and some white paint to make them look broken...


I scored once again at the thrift store and found a blue puffer vest that looked very similar to the blue puffer jacket Barb wears when she gets sucked into the Upside Down. I placed a pillow inside the puffer and also below it, attached those to two connected poster boards and taped it all up from every angle to secure it all - this way she had a little matter to her, and wouldn't fall off the surface that secured her. The fact that her puffer was a vest and not a jacket worked perfectly fine too, as I planned to cover her (and the tape around her) almost completely in fake spider webs.


Although I usually like to take my haunts from 0 to 100, this Halloween was oddly, and pleasantly different. I usually go above and beyond, but given our circumstances, I had no choice but to go with the flow and see what worked - and I still managed to create both a demogorgon and a dead Barb, not bad! Overall, I'm happy with how it turned out, and happy the party I got to decorate turned out to be a blast!


No comments:
Post a Comment